A comprehensive guide explaining different aspects and components of the Superfetch Windows 10 feature is mentioned in the following article.
Service Host Superfetch or commonly known as Superfetch is an inbuilt feature in Windows operating system PCs. The main purpose of this Windows feature is to speed up the loading time of the applications on the PC and to boost the device performance.
This particular article consists of a comprehensive guide that will walk you through all the different aspects and components of the Superfetch Windows 10 feature. All the information on this Windows feature can be found under the heads below. In addition, the best PC cleaner and optimizer software is discussed at the end of this article.
Superfetch is an inbuilt standard feature that automatically loads the applications on the user’s PC. The motive behind this feature is that preloading the applications speeds up the device performance and saves time for the user.
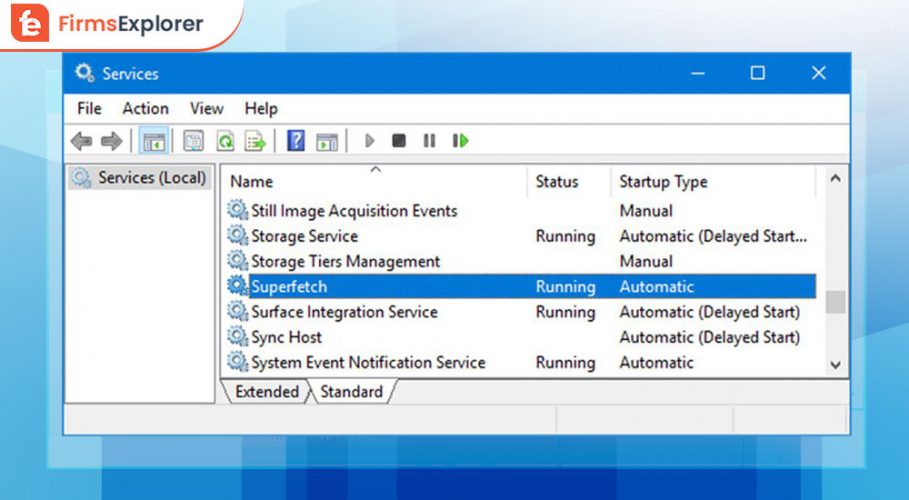
The Service Host Superfetch is a part of the Windows 10 operating system and is available in all other Windows versions since Windows Vista. The feature is very helpful for the users, but it has negative aspects as well. When the feature is running for a long period of time, it consumes a lot of CPU and RAM resources.
So it becomes important to disable and enable the Service Host Superfetch feature as per the needs and requirements. Know the correct procedure for both of these from the heads below.
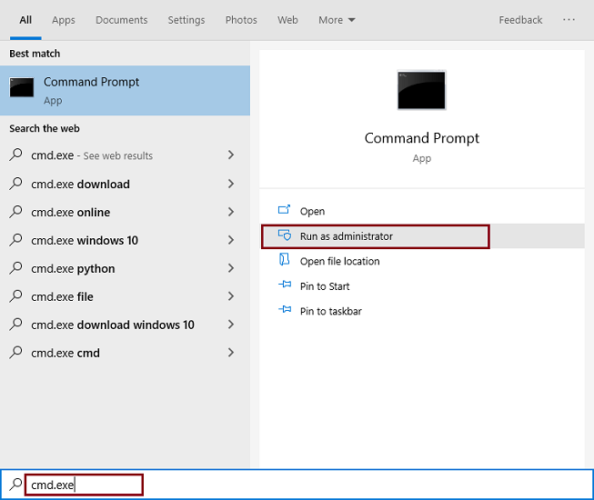
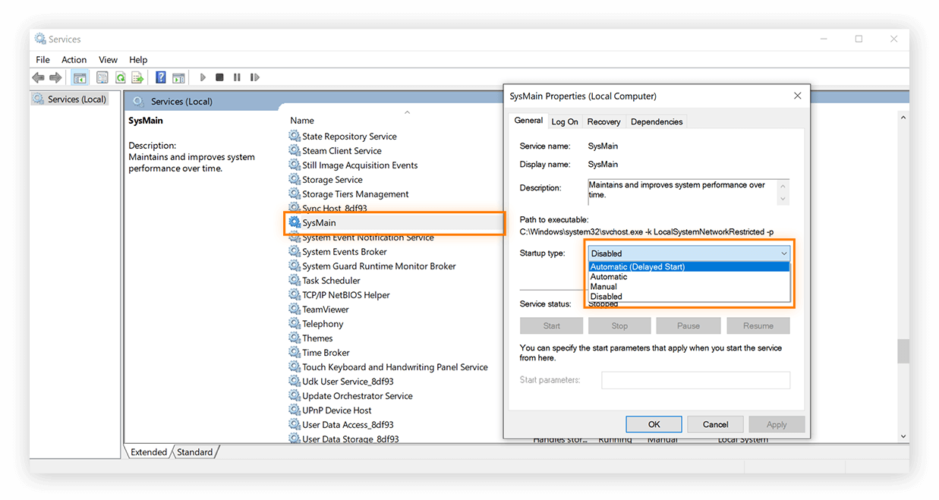
A Windows user can disable Superfetch Windows 10 feature in two different ways. The first way is with the help of the Windows service manager. And the second way is disabling it from the command prompt. Both the methods are clearly explained in this section below.
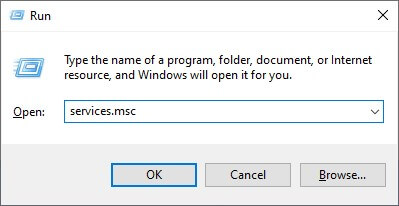
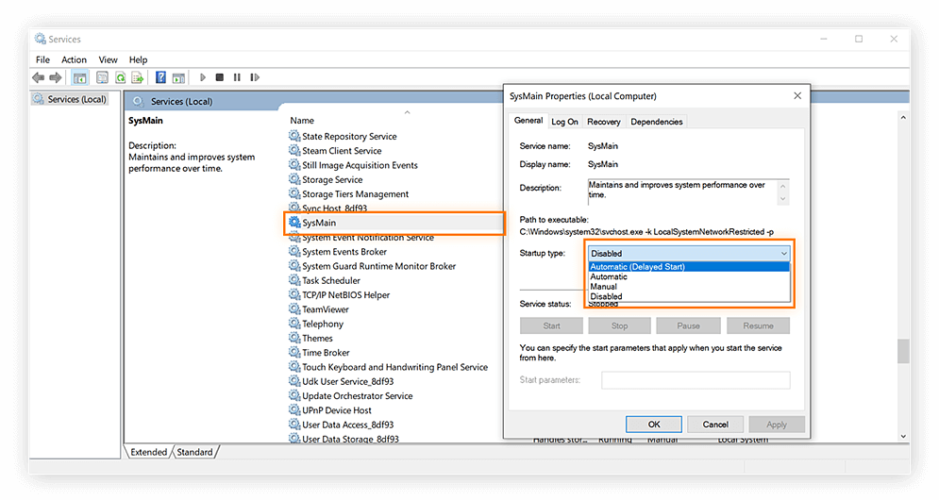
The procedure or steps that need to be kept in consideration to disable Superfetch Windows 10 feature from the Windows service manager are as follows:-
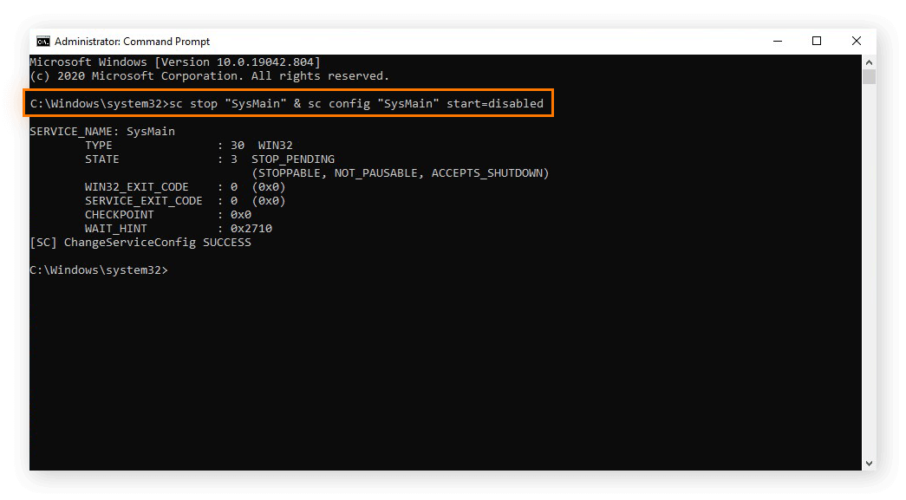
sc stop “SysMain” & sc config “SysMain” start=disabled
These are two different ways in which you can disable Superfetch on a Windows operating system PC. Now when you have known the procedures of disabling the Service Host Superfetch. Let us now look into the procedure to enable Superfetch. Hope now you are clear with how to disable Superfetch on Windows.
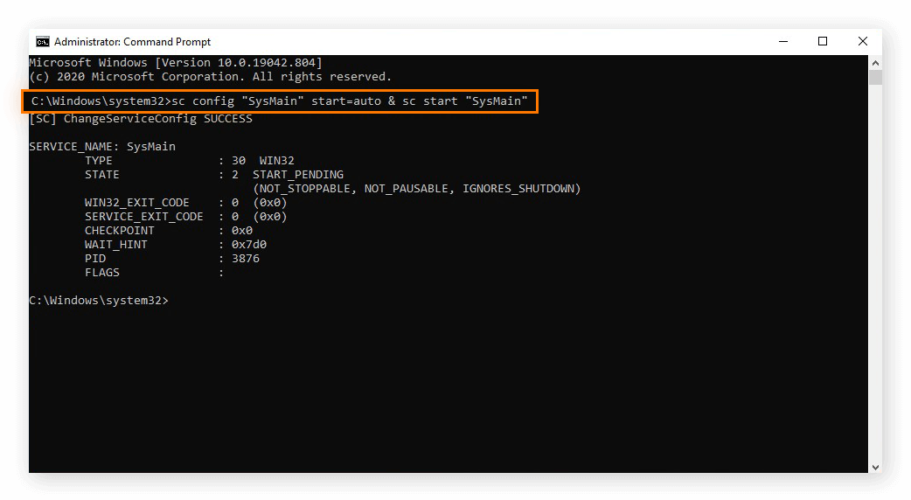
Same as disabling the Superfetch, the procedure of enabling it can be done in two different ways. The first is from the Windows service manager and the second one is from the command prompt. Both of them are mentioned below.
sc config “SysMain” start=auto & sc start “SysMain”
As you can see the steps for enabling and disabling the Service Host Superfetch in Windows PC are similar in some contexts. Let us now know how does Superfetch works on a PC from the head below.
The Superfetch features on the Windows PC keep an eye on all the activities done by users. It notes down the most frequently and majorly used applications on the system. Basically, the Superfetch Windows 10 feature analyzes the user’s behaviour and prioritizes things in the system background.
The algorithm of Service Host Superfetch can predict up to three applications at a time of the user’s PC. The feature preloads the applications and as soon as the user launches the application, it loads the application completely in no time. This allows users to experience a better performance over the device. But one must always keep an eye on the Hard disk usage of the Superfetch.
To check and keep an eye on Service Host Superfetch hard disk usage on Windows PC, follow the steps given below:-
Examine all the components correctly and if you find anywhere the Superfetch is using high PC resources. Disable it by the procedure explained in the article above.
There are some circumstances when a user must disable this Superfetch feature from the Windows PC. If you come across any situation where the Superfetch is consuming high computer resources. It can be any resource like CPU usage, RAM consumption, Battery life (In laptops), Hard disk space and some other resources.
The main reason that justifies the requirement of the Service Host Superfetch feature on a Windows operating system PC is that it improves the performance of the PC. Superfetch learns about users’ behaviour and predicts more accurately for the applications.
When a user installs a new application on the PC, this inbuilt feature analyzes the RAM consumption by the application. And if the user accesses it more frequently, the Superfetch gives preference in preloading that particular application.
Service Host Superfetch is a useful Windows feature that enhances device performance. But in times when it lacks, you must disable it from your Windows OS computer device.
As mentioned at the starting of this article, here is the best PC cleaner and optimizer software for Windows operating system devices. Users are highly recommended to use IObit Advanced SystemCare software that allows users to clean registry in Windows 10 PCs.
The IObit Advanced SystemCare software cleans the user PC with artificial intelligence. It creates a different personalized plan for the user’s PC and removes tons of junk files and unnecessary cache or log files from the PC.
When all these unwanted files are deleted from the computer device, the performance of the PC automatically rises and users get a better experience while working.
Along with this IObit Advanced SystemCare software protects the users’ data from all types of cyber attacks and online scams. Also, users get a boost in the speed of the internet when using this particular PC cleaner and optimizer software. Download the latest version of the software by clicking on the download link.
![How to Kill Processes on Mac [Complete Guide]](https://www.firmsexplorer.com/wp-content/uploads/2021/12/how-to-kill-processes-on-mac-909x500.jpg)
December 12, 2021
February 21, 2022

Deprecated: File Theme without comments.php is deprecated since version 3.0.0 with no alternative available. Please include a comments.php template in your theme. in /home/firmsexplorer/public_html/wp-includes/functions.php on line 5613