![Best-Ways-To-Optimize-Windows-10-Performance-[100%-Working]](https://www.firmsexplorer.com/wp-content/uploads/2022/09/Best-Ways-To-Optimize-Windows-10-Performance-100-Working-909x500.jpg)
Today’s computers involve more sophisticated hardware and smarter operating systems. However, sluggishness and poor performance continue to be the primary issues for computer users. Therefore, spend some time making sure your present Windows-based PC is operating well by optimizing the PC before investing even a dollar on a new, higher-performing one.
Your Windows 10 computer’s performance will eventually decline for various reasons, such as hardware issues, hardware flaws, malware or Virus infections, and compatibility problems. Your computer does not necessarily need to be replaced if you discover it is getting slower. Instead, little changes to software and hardware can greatly improve the performance and optimize Windows 10 PC for gaming and other tasks.
This article to optimize Windows 10 performance will show you how to enhance, and optimize the performance of your windows 10, regardless of whether it has an outdated hardware setup or not. So let’s find out some of the best ways for optimizing your PC.
There are a variety of methods you can take for optimizing your PC, ranging from basic hardware upgrades to Windows customizations and regular maintenance. Here are some tips to optimize Windows 10 performance and make the most of your computer.
Possibly it is the first step you can take to optimize Windows 10 is to shut down and restart your computer. It might be the obvious solution initially, but it’s not usually the first thing that pops into people’s heads. The computer typically closes all open programs and processes when the device restarts. In order to address concerns with stability and general performance brought on by running the operating system for a long time, the data placed into memory is also cleaned. Take the following actions to shut down the computer and restart Windows:
(A quick reminder: Neither the “Sleep” nor the “Hibernate” options clear the data stored in memory or reset the system session).
4. To start the computer, press the power button. When Windows 10 restarts after you finish the procedures to optimize Windows 10 performance, the performance should significantly improve.
On Windows 10, several applications can set themselves up to launch automatically at system startup and keep running in the background, using up system resources and causing the experience to lag. Disabling all startup apps, or at least those you don’t use frequently, is advised when optimizing your PC.
Follow these instructions to stop programs or applications from starting up on Windows 10:
Restart your Windows 10 computer system. After finishing this optimizing PC procedure, the computer will start up more quickly than before. The improvement in the speed of your PC after optimizing the PC for gaming and other tasks will differ based on the programs you disable and the hardware setup.
Even before you sign in, Windows 10 includes a function that restarts the applications from your last session, which can help optimize Windows 10 performance. This is a useful tool that can expedite picking up just where you left off, but it may have an adverse effect on system performance. If the option to restart applications at startup is turned on, follow these instructions to turn it off:
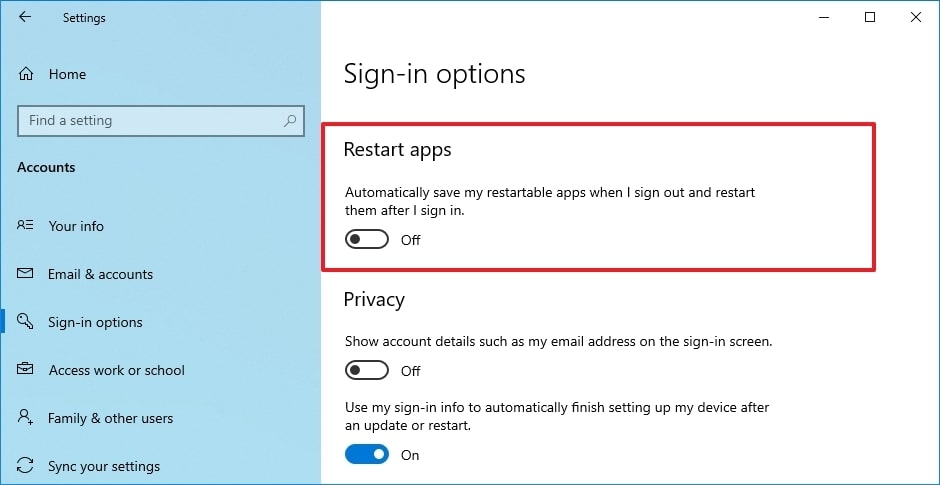
The desktop apps won’t reopen after you finish the instructions, which will help you optimize Windows 10 and improve system performance overall.
Some programs and applications on Windows 10 have the ability to carry out background operations even while you aren’t using them. You can choose which applications can run in the background or disable the option to prevent all programs from running in the background if you wish to optimize Windows 10 performance as much as possible. Follow these simple steps to stop programs from running in the background on Windows 10:
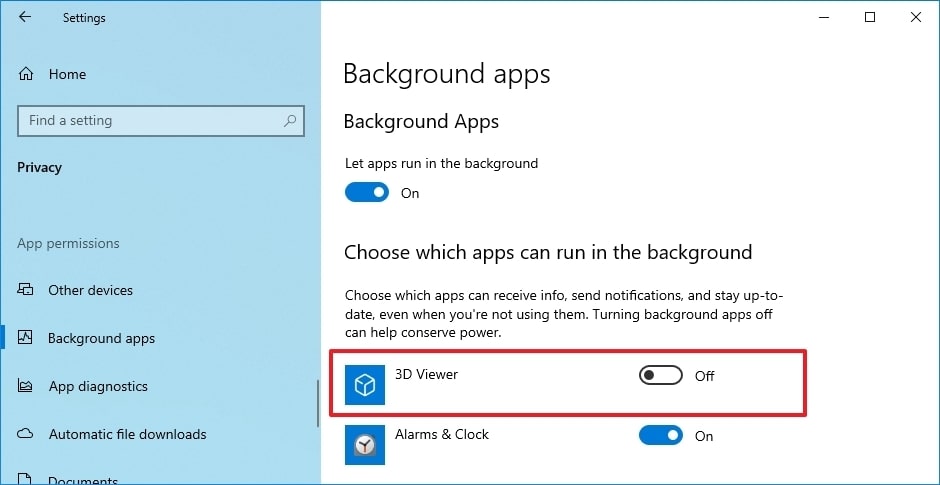
Disable the feature for all current apps by switching off the Let apps run in the background toggle (excluding win32 apps). Once you’ve finished the instructions, apps won’t use up any further resources when you aren’t actively using them to optimize Windows 10 PC for gaming and other useful tasks.
New devices frequently come preloaded with unnecessary software, such as the typical system tools and bloatware that will only take up storage space and resources. In order to optimize Windows 10 performance and improve system speed, you should always get rid of those unnecessary apps. Follow these procedures on Windows 10 to remove unnecessary apps:
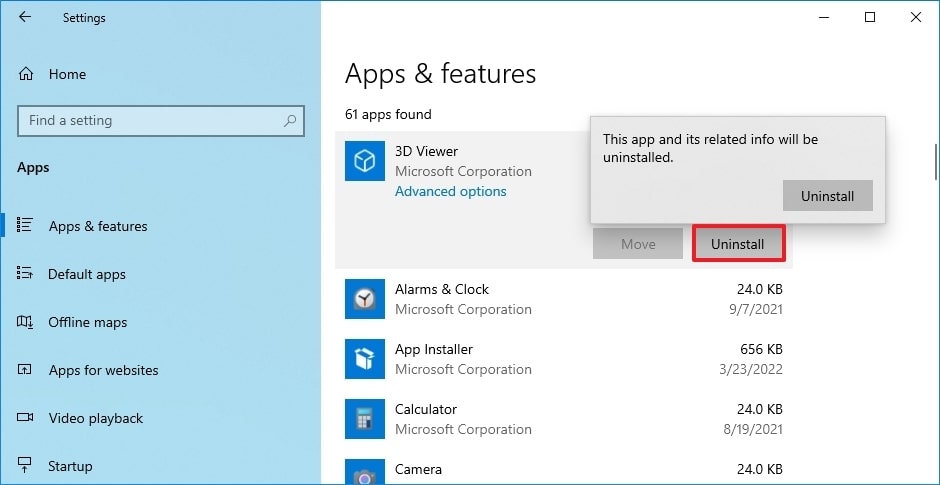
Once more, click the Uninstall button. Alternately, follow the on-screen instructions to complete the program removal. After completing the procedures, you might need to repeat them in order to remove any remaining unneeded apps from the system. That would really help to optimize Windows 10 PC for gaming and other important tasks.
It’s never a good idea to run Windows 10 PC with a nearly full hard disc because it will damage performance, regardless of whether you have a Solid-State Drive (SSD) or standard Disk Hard Drive (HDD). The disc is likely running out of storage space if the system has relatively recent technology and you notice that programs, organizing files, and other operations are taking longer than usual to complete.
This usually becomes more obvious once the drive has reached about 70% of its capacity. Using the Storage options to remove temporary and useless files to free up space is one technique to stop the storage from affecting performance and optimizing your PC. Follow these procedures to free up storage space using Windows 10’s Storage settings:
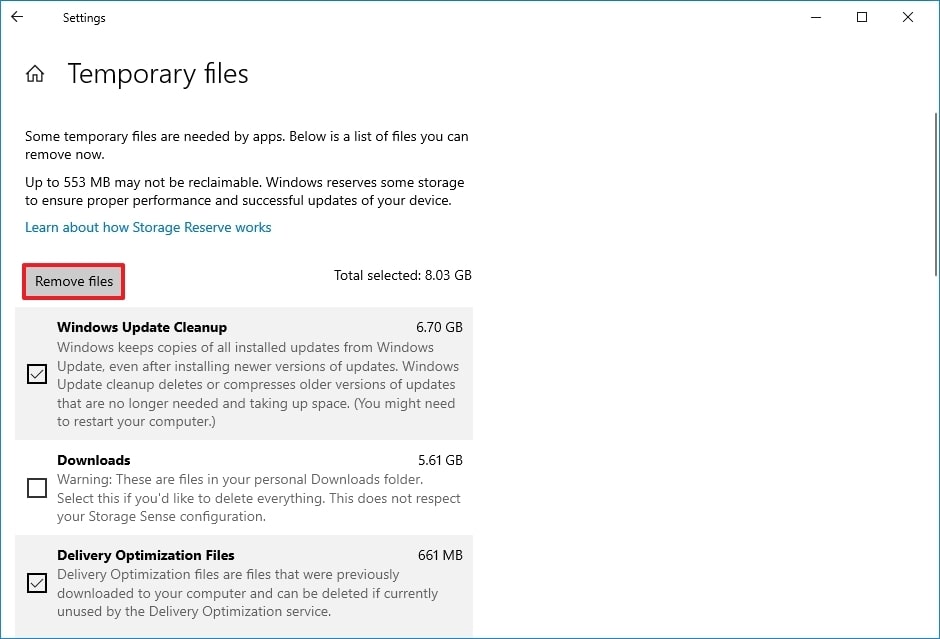
If the system is able to free up enough space, the performance of the device should substantially increase after you’ve finished the procedure for optimizing your PC.
Read Also – What Is Virtual Reality and How Does it Work?
If your computer has outdated technology and a typical rotating platter hard disc, organizing the data can improve responsiveness. Use these procedures to launch the defragmentation program on Windows 10:
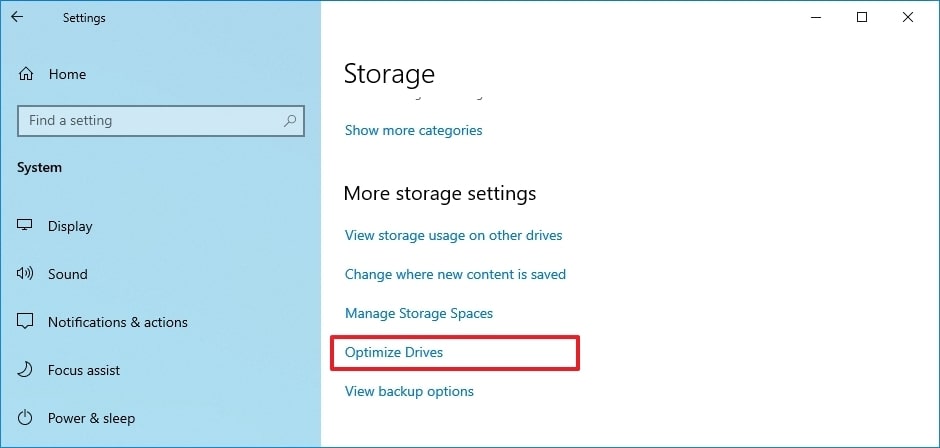
When you’re done optimizing Windows 10 for gaming and other important tasks, the utility will reorganize the files to make them quicker to reach the next time they’re needed, resulting in a discernible performance boost. The only drawback is that this optimizing PC process may take a while, depending on the amount of data on the drive. (It is better to let the procedure go overnight if you use an outdated system.)
Malware infection may cause a system that starts to operate very slowly. Typically, spyware, viruses, and other harmful malware eat up many system resources and render a device inoperable. Even though Windows 10 include in-built Microsoft Defender Antivirus to optimize android and Windows 10, this does not guarantee that malware won’t enter the system. Try performing a complete virus scan on the device if you think it may be contaminated. Follow these instructions to run a thorough virus scan on your Windows 10 computer:
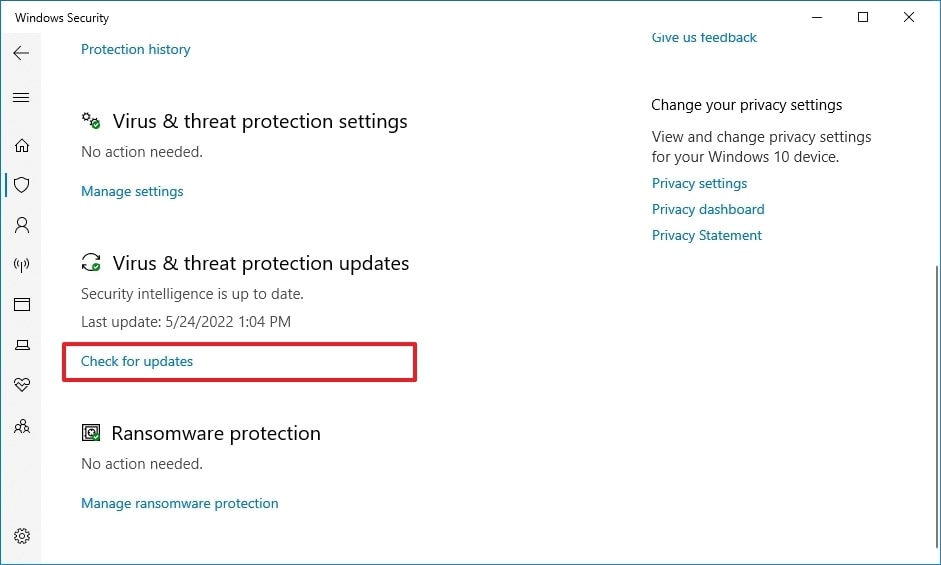
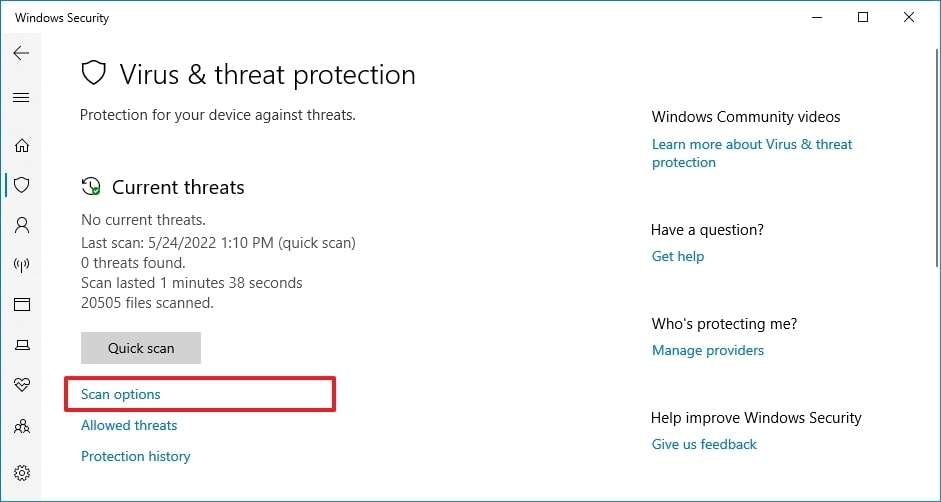
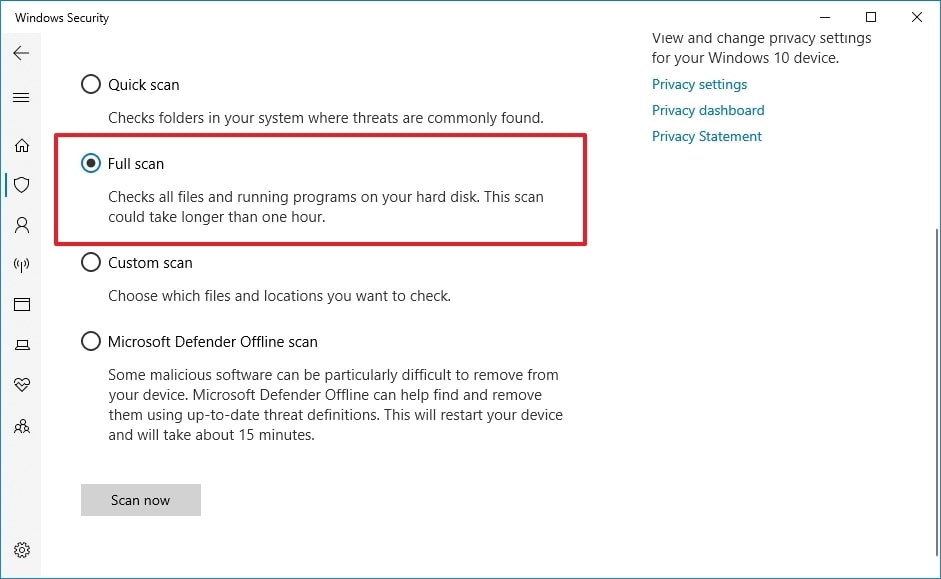
When you’re done with the process of optimizing your PC for gaming and other tasks, Microsoft Defender Antivirus ought to find and eliminate any malware affecting performance.
Microsoft delivers updates proactively to fix issues and optimize Windows 10 performance, including patching security flaws and new features. Although updates might occasionally be the cause of something not operating properly, keeping them up to date can make your device faster.
Updates for Windows 10 are carried out automatically. However, based on the update or the device’s setup, they may not always be downloaded and installed immediately. For instance, a performance-enhancing update may be available if your computer operates slower than usual. Follow these procedures to install updates on Windows 10 manually:
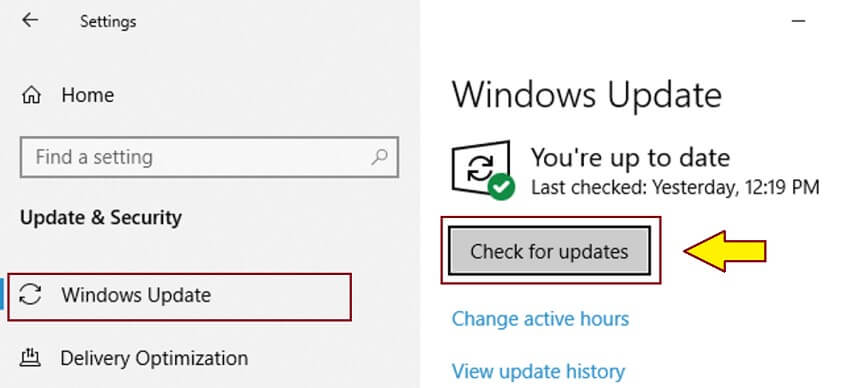
After you follow the instructions to optimize Windows 10 for gaming and other tasks, the new upgrade ought to aid in enhancing system performance.
If the device has an older version of Windows 10, upgrading to the most recent version can help optimize Windows 10 for PC gaming or introduce new features that could make you more productive to get work done faster. To upgrade to the most recent version of Windows 10, use these steps:
After you finish the procedure to optimize Windows 10, the system will restart to install the new version, enhancing the functionality of the entire system.
Downloading the latest or beta version of the driver manually from the vendor support website should optimize Windows 10 and fix any compatibility problems or poorly designed drivers causing your machine to run slowly. However, you must first obtain the latest driver bundle from the company’s website, then use the following procedures to extract the contents using a self-extracting or.zip extension file: Quick note: It is advised to follow the directions on the vendor support website to finish this activity. If there are no instructions, you can follow the steps below.
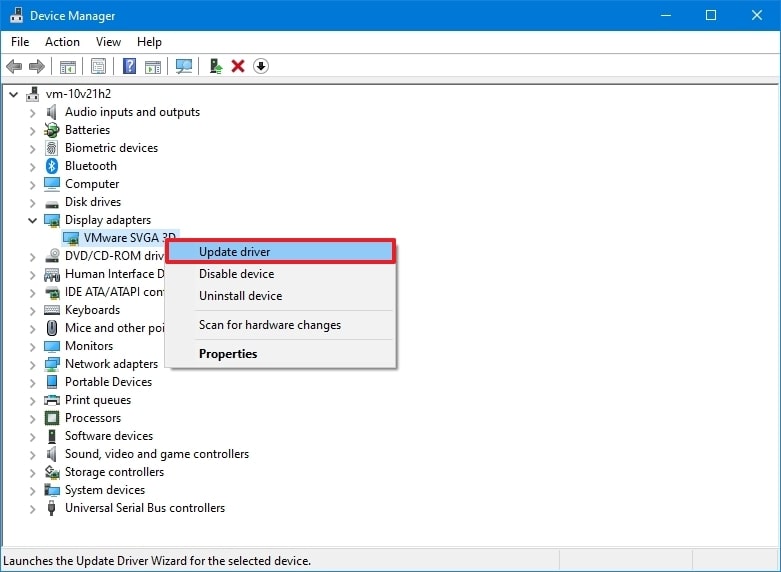
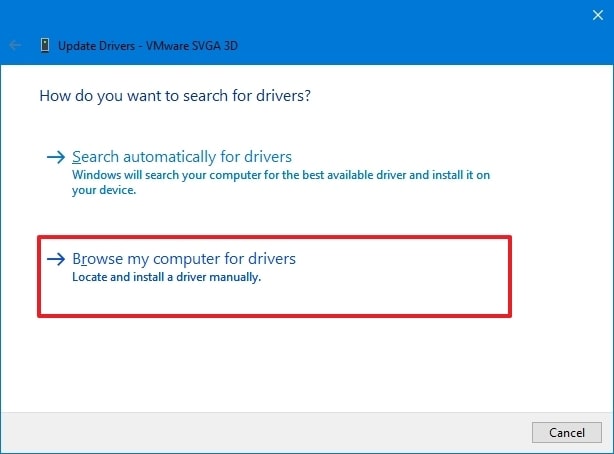
When you finish the procedure to optimize Windows 10 for gaming and other tasks, the new driver version will install to improve system performance and address compatibility problems.
In order to improve your computer’s power usage, Windows 10 offers three distinct options (Power saver, Balanced, and High performance). So, use the “High performance” option to optimize Windows 10 performance and increase system speed since it enables the device to run more quickly while consuming more Power. Follow these steps on Windows 10 to choose a new power plan:
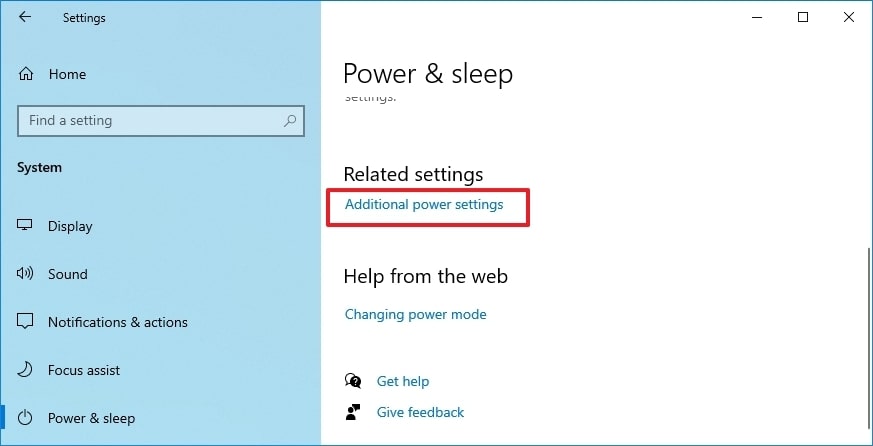
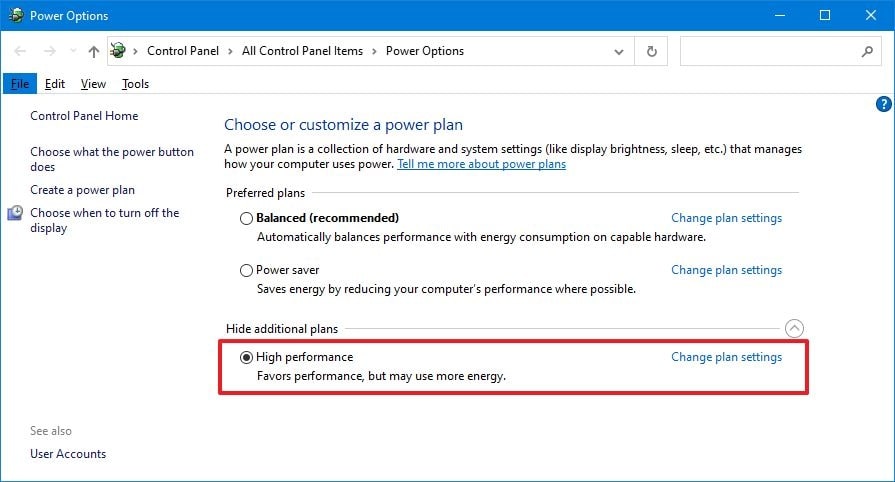
If you can’t see any plans, you might have to use the “High performance” settings to design your own power plan in order to increase performance. If you tap or click the battery symbol in the taskbar’s navigation pane of a laptop, you can alter the mode to improve performance by using the slider to select “Best performance.”
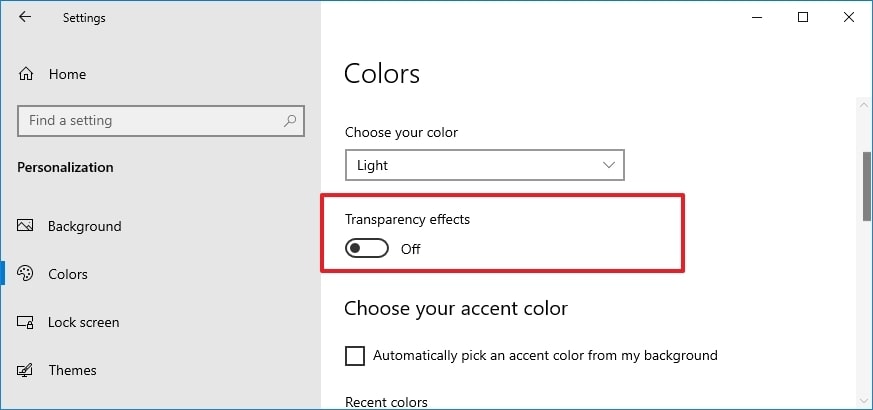
You may find several visual effects on Windows 10, including animations, shadows, and more sophisticated visual components like blur and transparency, which are a component of the Fluent Design language. Although these effects might enhance the visual appeal of the experience, they also use resources that may cause PCs with outdated technology to lag. You can disable certain effects to conserve resources and optimize Windows 10 for gaming and other tasks.
Use these instructions on Windows 10 to turn off shadows, animations, smooth fonts, and other effects:
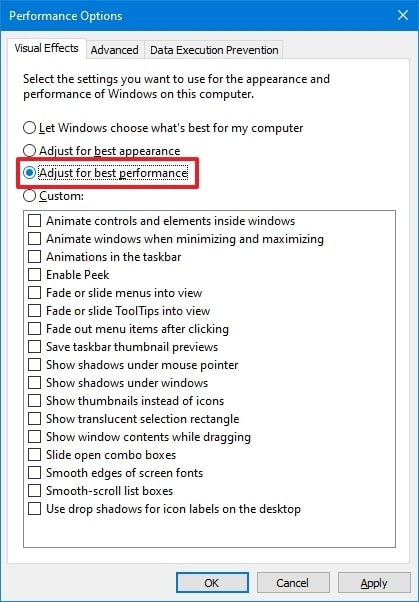
A quick tip: This setting will also have an impact on font rendering. Select the Custom option, remove all the settings, but leave the Smooth edges of the screen fonts option selected if you wish to retain sharp and readable fonts.
The aesthetic effects will be turned off once you’ve finished the instructions, and using the components will seem more responsive.
Follow these instructions to disable Fluent Design effects in Windows 10 quickly:
Once you’ve finished, it will optimize Windows 10 performance, and more system resources will be available for important activities.
Read Also – 8 Best Airdrop Alternatives for Android and Windows
The indexing process can occasionally use a lot of resources, which can have a negative influence on the experience – particularly on low-end devices – despite the fact that Windows 10 search is a vital function for finding apps, settings, and files. Additionally, by removing all search locations from the indexing process, keeping your files structured can slow things down. Follow these steps to set up the indexer on Windows 10 to enhance system performance:
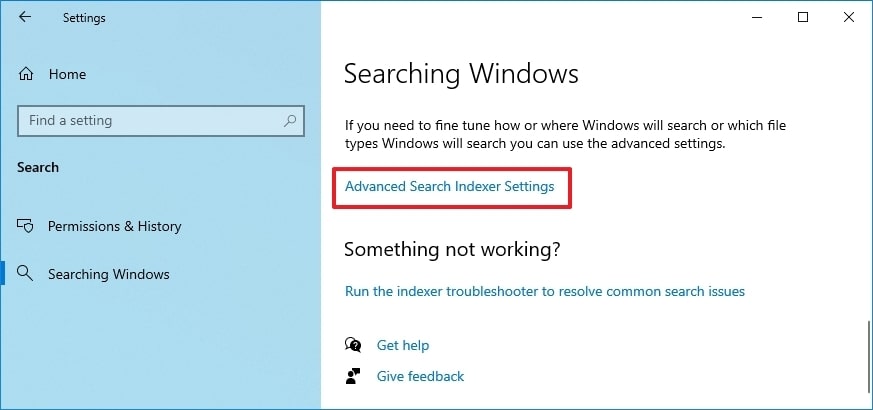
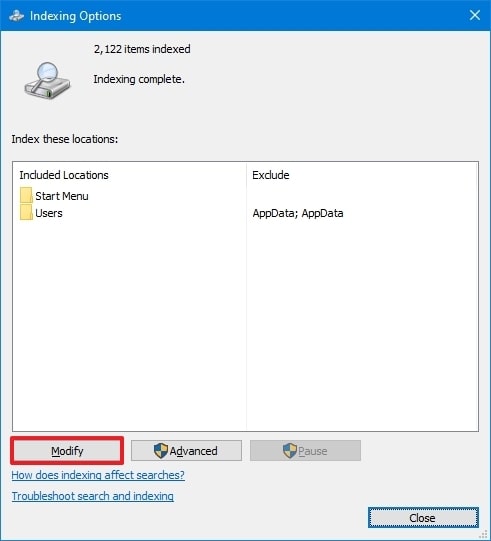
As soon as you’ve finished the procedure to optimize Windows 10, it will continue to operate on your device and stop indexing the designated places, enhancing overall speed.
It could be time to switch to an SSD if you do not see performance gains even after performing every procedure for optimizing the PC. One of the greatest ways to optimize Windows 10 and improve performance on outdated hardware is probably to upgrade to a solid-state drive.
Since SSDs typically lack the moving elements found in conventional hard drives, data may be read and stored much more quickly. As a result, switching from an HDD to an SSD will make Windows 10 boot substantially faster, apps start and run faster, and the overall performance will be snappier.
Everyone wants their system to operate quickly and without any latency while multitasking. In order to maximize the performance of Windows 10, it is crucial to maintain the system by applying a variety of tips and techniques.
You’ll undoubtedly want to maintain your computer’s peak performance by using some of the aforementioned advice to optimize Windows 10 performance once you’ve cleaned it up. It’s a great idea to plan a monthly cleanup to prevent getting annoyed with subpar performance. You’re all set if you use the list of suggestions above as a convenient checklist.

September 21, 2022

October 22, 2022

July 28, 2022
Deprecated: File Theme without comments.php is deprecated since version 3.0.0 with no alternative available. Please include a comments.php template in your theme. in /home/firmsexplorer/public_html/wp-includes/functions.php on line 5613